Device Registration
This guide explains how to register a server for management in the KIOPS platform. Device registration is the starting point for everything. You must register a server first before you can connect runtimes like Docker or Kubernetes on top of it.
This guide helps infrastructure and operations teams getting started with KIOPS bring every server they manage into one place. There is no need to memorize commands; once you fill in the IP, port, and account in the modal, KIOPS handles SSH connection, system info collection, and AWX inventory registration for you.
Before You Start: Terms to Know
It is fine if some of the terms below are new. Here is a short primer on the words used most often in this guide.
- SSH: A secure tunnel for sending commands to a remote server (it feels like sitting in front of the server's keyboard).
- Gateway / Jump server: An intermediate server you must pass through to reach internal hosts (think of the lobby guard you greet before entering a building).
- Multi-hop: Connecting through several stages, such as jump server -> another server -> final target.
- System info collection: KIOPS's action that SSHes into a host and automatically gathers OS, CPU, memory, and disk facts.
- VPN: A dedicated tunnel into an internal network (the same VPN you turn on to reach your office intranet).
- Credentials: Either an SSH password or an SSH private key file. On first entry they are encrypted (AES-256-GCM) and stored on the KIOPS server, then automatically reused for later operations. No plaintext is kept in the browser.
Why Is Device Registration Needed?
KIOPS connects to servers via SSH to perform various management tasks. Once you register a device, you can monitor server status (CPU, memory, disk), manage Docker/Podman containers, and deploy and operate applications.
Prerequisites
The following conditions must be met before registering a device:
- The server to register must be accessible via SSH
- The SSH account must have root or sudo permissions
- Network policy must allow the KIOPS agent to access that server.
- Prepare a password or SSH private key file (.pem, .key) for SSH authentication.
If you are unsure whether SSH access is available, you can verify it from a terminal before registering (you can also ask your IT contact to run it). If the following connects successfully, KIOPS will connect too.
ssh username@server-ip-address                       # Password authentication
ssh -i /path/to/private_key username@server-ip-address  # SSH key authentication
Registration Procedure
Step 1: Navigate to Device Management Page
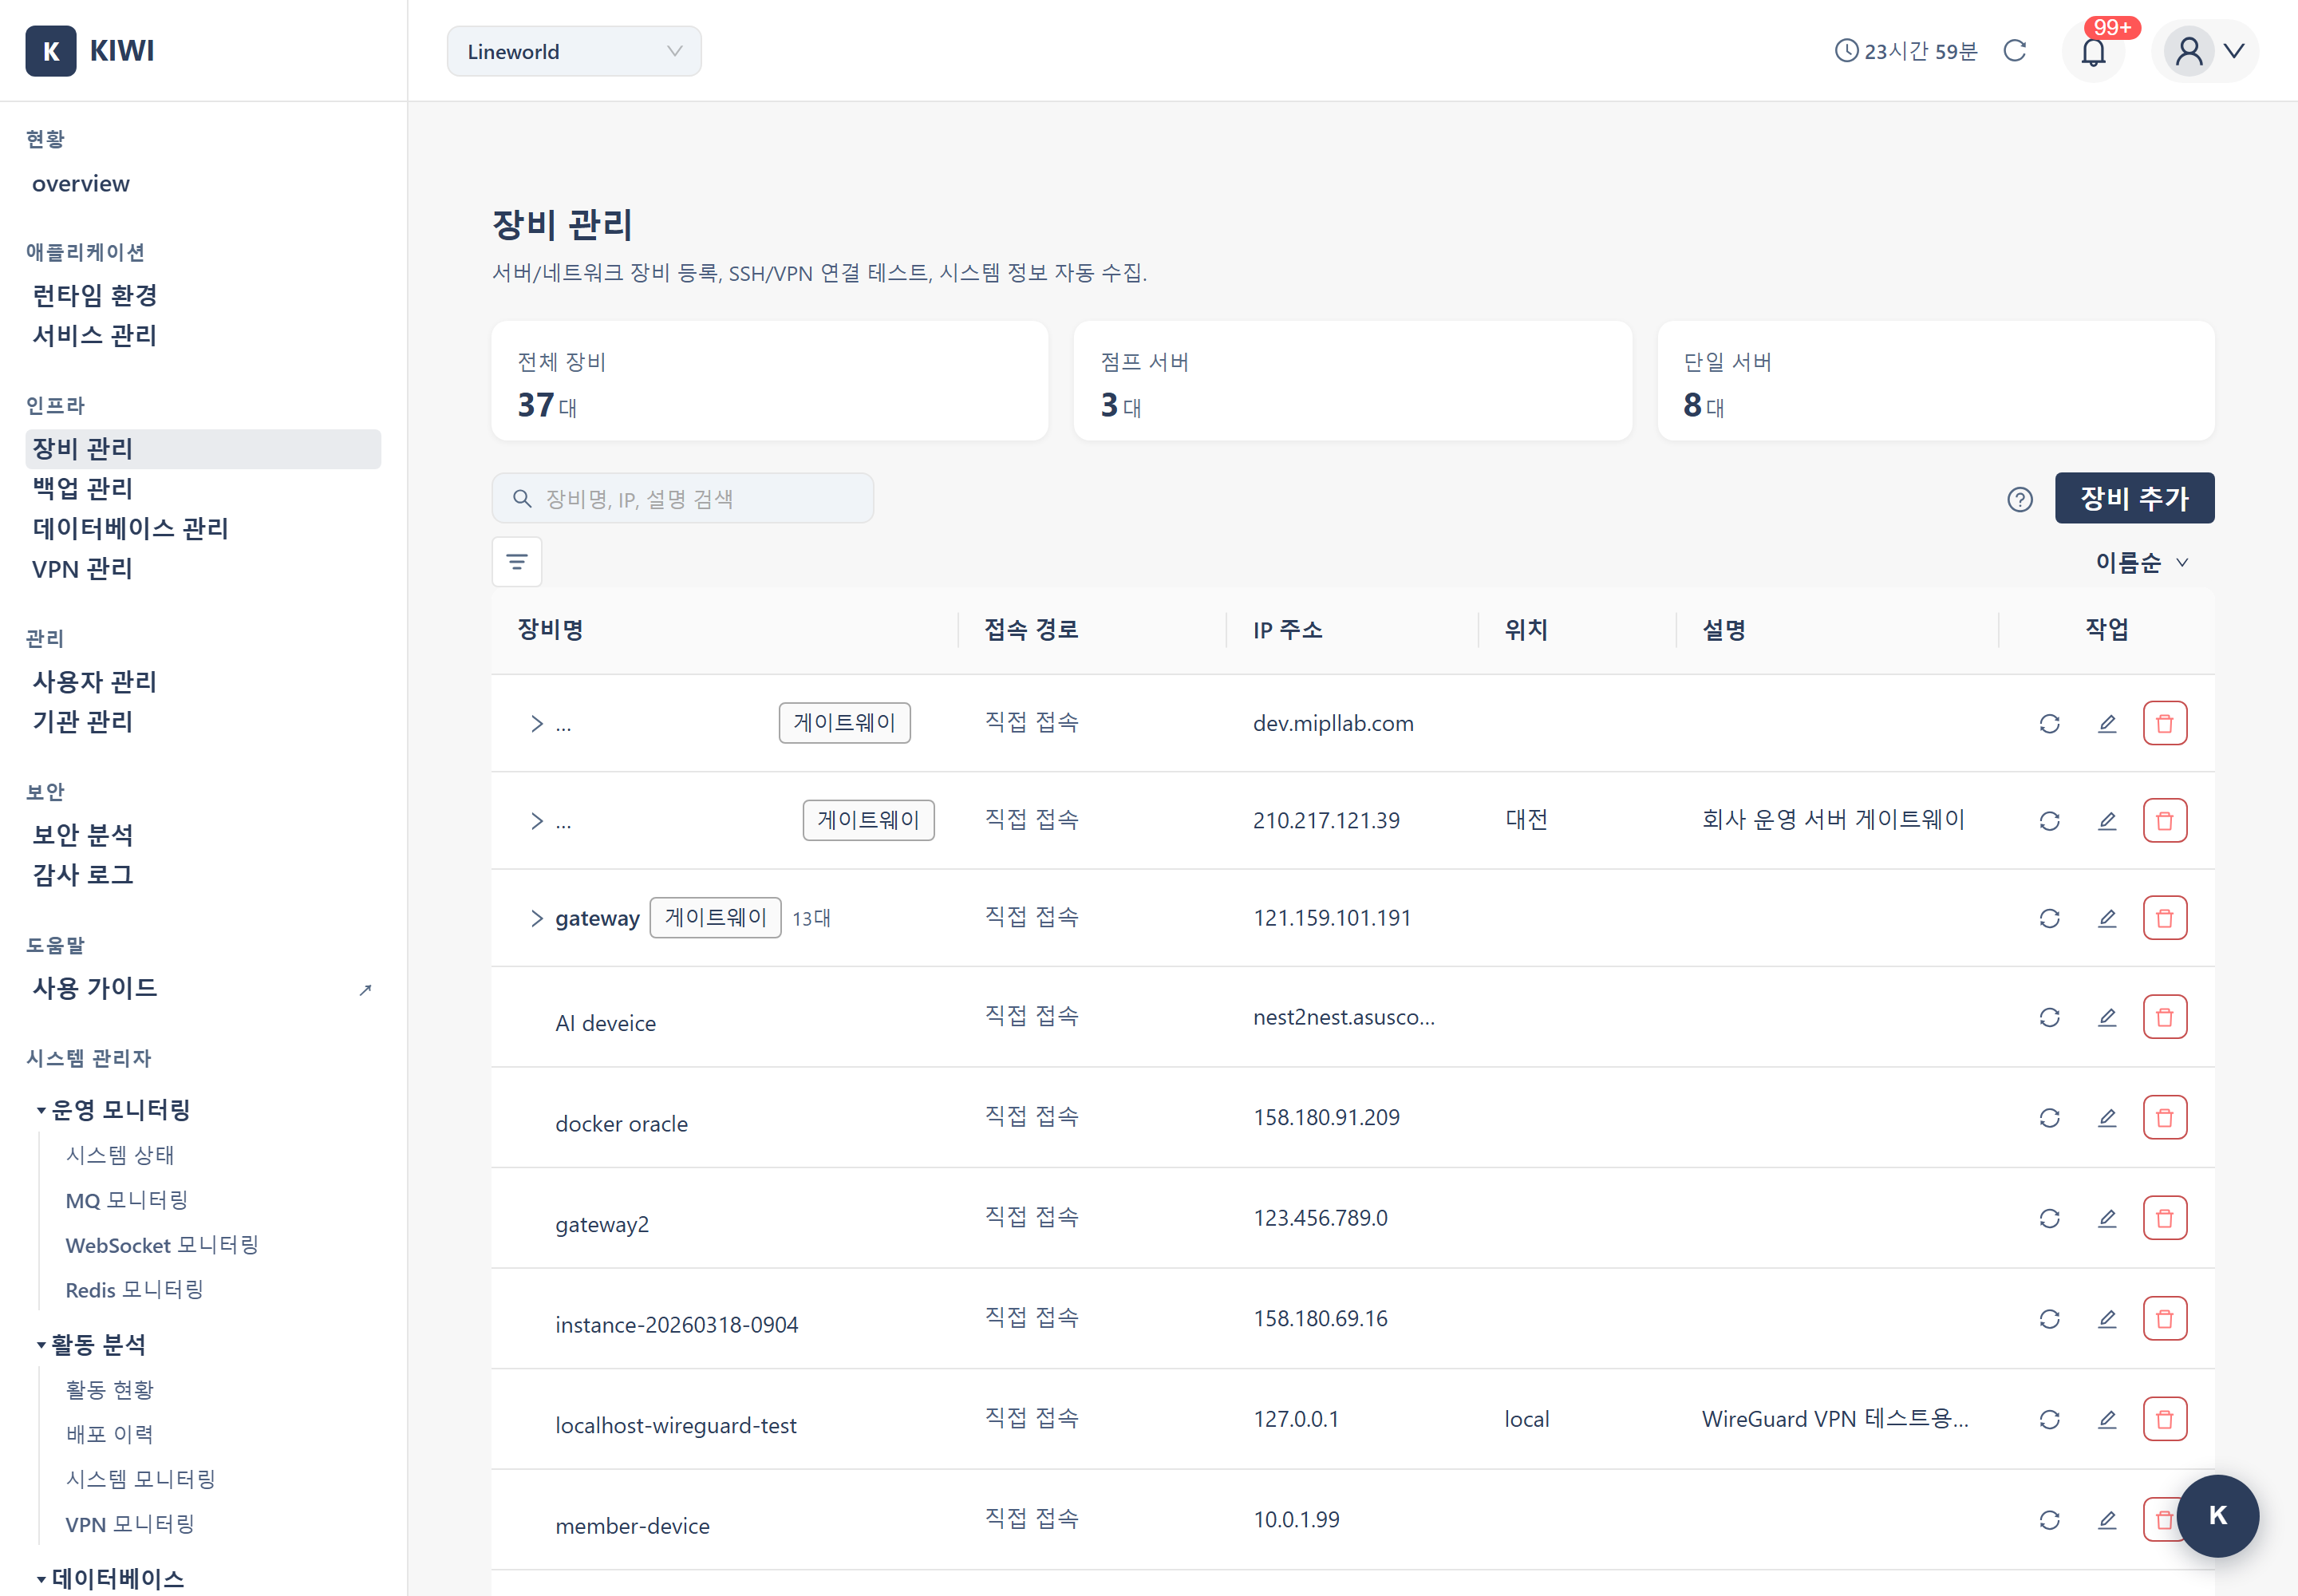
- Click the [Device Management] page in the left menu.
- Click the Add Device button in the upper right corner (it is a single button, not a dropdown).
Step 2: Enter Basic Information
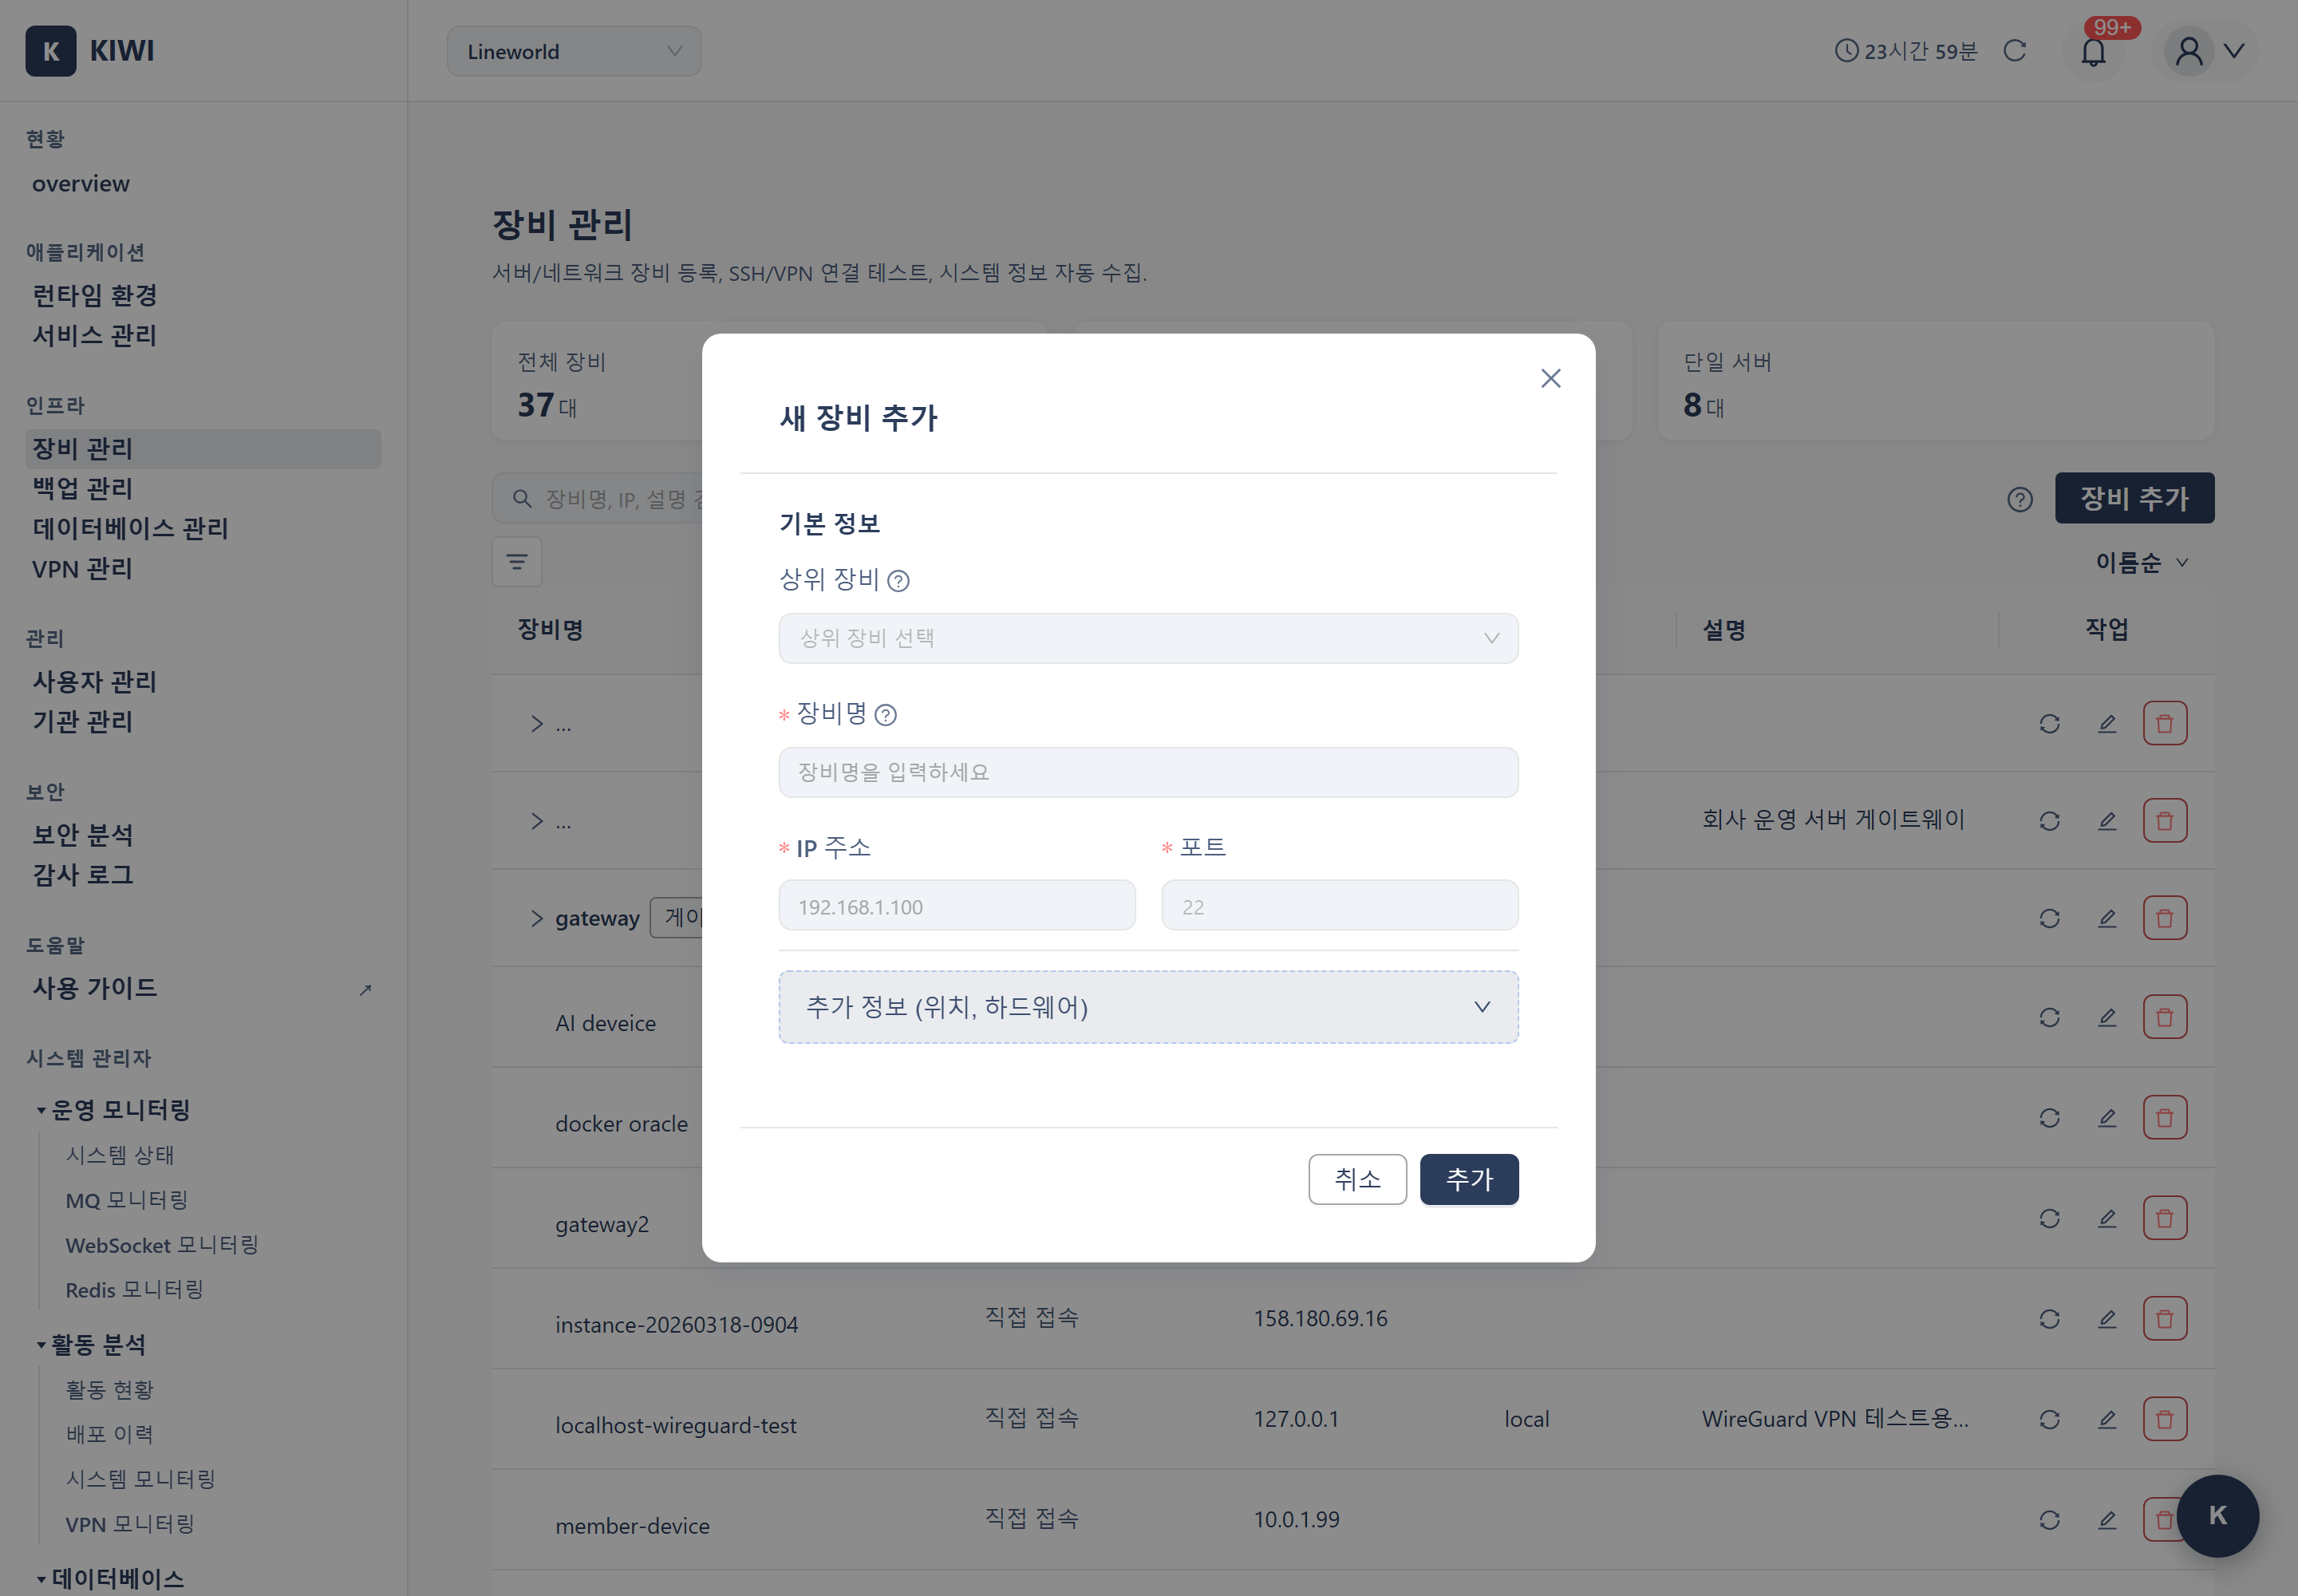
Enter the following information in the device registration modal:
- Parent Device (Optional): Select the parent device (jump server) if you have to route through one, or leave it empty when the target is directly accessible (multi-hop, see glossary). When you choose a parent device, the modal shows the SSH hop chain from the jump server to the target as an arrow path at the bottom, so you can verify the route.
- Device Name: An identifier to distinguish the device (e.g.,
prod-web-01,dev-server). Including environment (prod/dev) and purpose makes it easier to find later. - IP Address: The server's IP address for SSH access (e.g.,
192.168.1.100). Enter the private IP if using a parent device. - Access Credentials (per-port accounts): A table that becomes active once you enter an IP. The device modal has no single Port field; register per-port accounts here instead. A single server can have multiple ports (e.g.,
22,5501), each with its own accounts, and the Connection badge shows the result of the last attempt — Connected, Failed, or Not checked (never attempted); [Test Connection] on the row checks it now. For a server hardened with a non-default SSH port (e.g.,2222,22022), add the account with that port here. - Use as Nginx server (Optional): A checkbox that marks this device as an external Nginx-only server. When enabled, the device becomes selectable in the external Nginx connection under [Service Management > Domain Settings], reusing its registered SSH credentials so you don't re-enter connection info.
Step 3: Configure Additional Information (Optional)
You can enter additional information as needed:
- Location: Physical location of the server (e.g.,
Seoul IDC,AWS ap-northeast-2) - Description: Enter a description for the server freely.
The device form has no VPN profile field. The access path to the target is determined when you start an operation. Only when both direct and VPN access are possible does the connection selection modal appear; with a single available path, KIOPS connects directly and automatically. See VPN Settings → Connection Mode for details.
Hardware Information (Optional - Additional Info toggle)
Expanding the "Additional Info" toggle lets you manually enter the OS and hardware specs (OS, CPU, memory, disk). These fields are auto-populated when system info collection runs, so use manual input only when you want to seed the inventory ahead of time.
Step 4: Save and Verify Connection
-
After entering all information, click the Add button to register the device.
-
In the device list, click the Collect System Info icon (sync icon) for the registered device.
-
If the target is covered by a VPN, the Connection Selection Modal appears so you can choose
VPN / Direct SSH. When only one access path is available, it connects directly without this modal.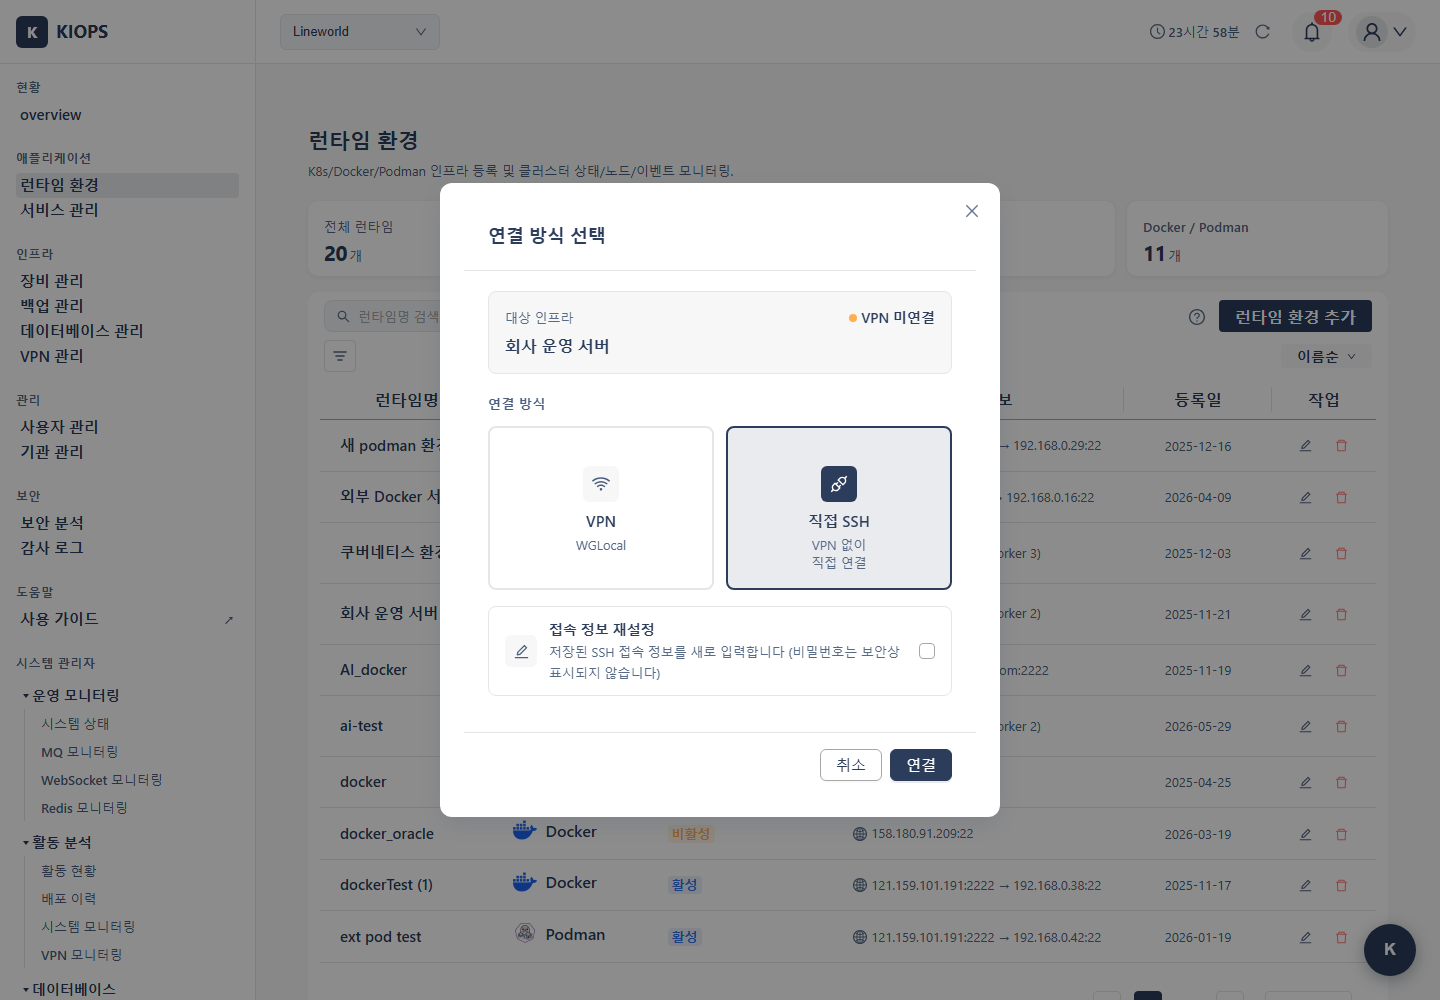
- VPN: Use the VPN path. If an active session exists, the jump-server hop is skipped and the target is reached directly.
- Direct SSH: Use the registered multi-hop chain as-is (parent device credentials are required when one is configured).
-
If stored SSH credentials exist, the server injects them automatically and collection proceeds right away. The input screen appears only when credentials are missing or wrong, in which case you select the authentication method:
- Password: Enter the username and password
- SSH Key: Enter the username and upload an SSH private key file (.pem, .key)
-
If the connection succeeds, OS, CPU, memory, and disk information will be automatically collected.
The SSH credentials you enter are stored encrypted (AES-256-GCM) on the KIOPS server and reused automatically for later operations against the same target. Signing in from a different PC or browser within the same organization applies them just the same, and clearing browser data does not lose them. To change saved authentication, re-enter it from the device edit screen in [Device Management]. Once registration completes, KIOPS also registers the device in the AWX inventory automatically, so it is immediately usable for Ansible-based automation.
Impact Analysis Before Deletion
Before deleting a device, KIOPS inspects related resources and shows the impact scope in a confirmation dialog headed "Deleting this device affects the following items":
- Child devices: Devices that use this device as their parent (jump server). If child devices exist, deletion is blocked and you must delete them first.
- Infrastructure to be deleted: Runtimes (K8s nodes, Docker hosts, etc.) that would lose their parent when the device is removed. Infrastructure that survives on another device (e.g., a multi-node cluster) is not deleted.
- Services to be deleted together: Services deployed on the above infrastructure, each deleted along with its security scan results and connected DBs.
The dialog warns "The items above are permanently deleted and cannot be undone." Always review the list before proceeding, and clean up the resources first if needed before deleting the device.
Troubleshooting
Common Pitfalls
- Leaving Parent Device empty while using a private IP: If a server is only reachable through a jump host but you leave Parent Device empty, KIOPS tries to connect directly from the KIOPS host to the target and fails. For environments that require a jump server, set the Parent Device to that jump host.
- Assuming SSH port 22: A server hardened with a non-default port (e.g.,
2222,22022) refuses the connection if you add the account with the default22. When adding the account, enter the exact port configured in the server'ssshd_config.
Connection Failure (Connection refused)
SSH connection failed: Connection refused
This means the server is refusing SSH connections. If you cannot inspect the server yourself, ask your IT contact to verify the items below.
- Check firewall settings: Verify the SSH port (default 22) is allowed in the server's firewall (
sudo ufw statusorsudo firewall-cmd --list-all). - Check SSH service status: Verify the SSH service is running (
systemctl status sshd). - Re-verify IP address and port: Double-check the IP and port are correct, and that you haven't confused public and private IPs.
Authentication Failure (Permission denied)
SSH authentication failed: Permission denied
This means the authentication information is incorrect. Server-side configuration checks can be requested from your IT contact.
- Verify account information: Confirm the username and password (or SSH key) are correct, with no leading/trailing spaces from copy/paste.
- When using password authentication: Verify PasswordAuthentication is
yesin the server's/etc/ssh/sshd_config(grep PasswordAuthentication /etc/ssh/sshd_config). - When using SSH key authentication:
- Verify the uploaded private key is in PEM format (content starts with
-----BEGIN ... PRIVATE KEY-----). - Verify the public key is registered in the server's
~/.ssh/authorized_keys. Then check that PubkeyAuthentication isyesin/etc/ssh/sshd_config, usinggrep PubkeyAuthentication /etc/ssh/sshd_config. - KIOPS supports RSA, Ed25519, and ECDSA key formats.
- Verify the uploaded private key is in PEM format (content starts with
What to Do Next
Device registration is complete. We recommend tackling the following items in order.
- Register a runtime environment - Attach a Kubernetes/Docker/Podman runtime on top of the device you just added (do this first).
- Re-run system info collection - If hardware fields are still blank, click the sync icon in the device list again to populate OS, CPU, memory, and disk.
- Configure VPN - If you need to reach the device from outside the corporate network, register a VPN profile so you can pick it directly from the connection selection modal.
Related Guides
- Kubernetes Connection - Connect a K8s cluster to the registered device.
- Docker Connection - Connect a Docker runtime to the registered device.