SCA Scan
What would you do if an npm package or Docker base image used in your project had a security vulnerability? SCA (Software Composition Analysis) automatically analyzes container images and software dependencies for known vulnerabilities (CVEs). On average, more than 80% of application code consists of open source libraries, so if even one has a vulnerability the whole application can be at risk. SCA automatically finds these hidden risks.
Overview
- Analysis target: Container images, dependency packages
- Analysis engine: Trivy (presented to users as the single detecting tool, with no tool selection UI)
- Vulnerability DB: NVD CVE database, Trivy DB, etc.
- Scan requested alongside: Image SBOM and license information (not an SCA by-product, but requested for the same image whenever an image SCA runs; it can also be run on its own from the SBOM · License tab)
Each item shows a badge for the tool that detected it. The backend runs Trivy and Dependency-Check together and merges the results as a union. Items detected by a single tool show a '[Tool] only' badge, and items detected by both show a 'cross-validation (Trivy + Dependency-Check)' badge. The UI does not provide a toggle for users to select a tool.
Analysis Targets
SCA analyzes various types of packages and images.
Image Vulnerabilities
Analyzes all packages included in a Docker image.
- OS packages: System packages from Alpine, Debian, Ubuntu, etc. (installed via apt, apk)
- Language packages: Packages installed via language-specific package managers such as npm, pip, maven, go
- Base images: Vulnerabilities in the base image itself specified in the FROM clause of the Dockerfile
Dependency Vulnerabilities
Analyzes the project's dependency files.
package-lock.json(Node.js)requirements.txt,Pipfile.lock(Python)pom.xml,build.gradle(Java)go.sum(Go)Gemfile.lock(Ruby)composer.lock(PHP)
package.json alone cannot tell you the exact installed versions, but lock files such as package-lock.json record the exact installed versions, so vulnerable versions can be detected precisely.
Step 1: Starting an SCA Scan
- Click the [Security Analysis] menu under the "Security" group in the sidebar.
- Select a service to analyze from the card carousel at the top of the page.
- Select the SCA tab.
- In the image table at the top, click the [Scan] button (or [Rescan] if the image was already scanned) on the row of the image to analyze; a scan options modal opens, and you confirm by clicking Start Scan in the modal. To inspect all currently deployed images at once, use the Scan Deployed Images button on the trigger bar at the top.
Entering /security?id={serviceId}&area=sca opens the SCA tab for that service directly.
Step 2: Configuring the Scan Target
2.1 Image Selection (Two Methods)
Specify the container image to analyze in one of two ways.
- Built image select dropdown: Choose from the list of images built for that service (recommended)
- Manual input: Enter the full image path directly (e.g.,
harbor.company.com/project/app:v1.2.3)
The image selected in the top image table is linked to the result area, so when there are multiple images you can switch the target image.
2.2 Automatic Registry Authentication
- If stored credentials exist for the registry the selected image belongs to, they are applied automatically.
- The stored credentials are sent to the backend automatically without the user needing to enter them separately.
- Even private registries that require authentication can be scanned immediately without separate input.
Scan options use backend defaults — VEX Hub filtering cannot be adjusted in the UI and always runs with the backend default (default ON). SBOM generation and license analysis are separate scans (Syft, and Syft + ScanCode for licenses), but an image SCA requests them for the same image automatically. See the SBOM Generation document for details.
Step 3: Running the Scan
When a scan starts, Trivy is executed, and the AST backend also runs Dependency-Check in parallel. The results are merged as a union, and each CVE records which tool(s) detected it. Progress is shown in real time via WebSocket.
[1/4] Pulling image...                 ← Image download
[2/4] Scanning OS packages...          ← OS package analysis
[3/4] Scanning application packages... ← Application package analysis
[4/4] Applying VEX filters...          ← VEX application
Scan completed!                        ← Done
(The box above is a generalized example to help understand the progress stages and does not exactly match the actual output format of the KIOPS console. The UI shows the stage labels defined in the code.)
Running an image SCA also requests an image SBOM (CycloneDX 1.6) and license analysis for the same image. The per-image [Scan] button and the [Scan Deployed Images] button at the top behave identically in this respect.
The SBOM is still a separate, independent scan rather than an SCA by-product, which has these consequences.
- A failed SBOM scan does not affect the CVE scan results, and vice versa.
- SBOM results may arrive later than the CVE results.
- A source code SBOM is never produced by SCA. Run it from the SBOM · License tab.
- License analysis is part of the SBOM scan, and results accumulate in the
license_analysistable.
See the SBOM Generation document for details.
Expected Scan Time
Scan time varies by environment (image size, network speed, package count, vulnerability DB cache state, etc.). The values below assume a typical environment and are for reference only.
Right after a fresh deployment of the analysis server, Dependency-Check has to download its vulnerability database, so the first scan can take noticeably longer than usual. The database persists once downloaded, so later scans are unaffected.
- Under 100MB: About 30 seconds
- 100-500MB: 1-2 minutes
- Over 500MB: 2-5 minutes
Step 4: Reviewing Results
4.1 Result Summary
When the scan completes, you can review the following at a glance.
- Total vulnerabilities: The total number of detected vulnerabilities
- Severity distribution: The number of vulnerabilities by Critical/High/Medium/Low
- Fixable: The number of vulnerabilities fixable by package updates
- Detecting tool: Shows the actual tool that detected each item. Items detected by a single tool show a '[Tool] only' badge (e.g., Trivy only, Dependency-Check only), while items detected by both tools show a 'cross-validation (Trivy + Dependency-Check)' badge. Every item states its detecting tool, so the source of each result is traceable.
4.2 Categorized View
Each vulnerability can be classified and handled with the following statuses.
- open: Newly detected, unhandled item
- resolved: Fix completed
- false_positive: Confirmed false positive
- accepted_risk: Risk accepted (acknowledged but will not be fixed)
4.3 Vulnerability Details
Clicking each vulnerability shows the following information.
- CVE ID: The unique identifier of the vulnerability (e.g., CVE-2021-44228)
- Package name: The name of the vulnerable package
- Current version: The currently installed version
- Fixed version: The version where the vulnerability is fixed (if available)
- Severity: CVSS-score-based severity
- Description: A detailed explanation of the vulnerability
- Reference links: Additional information such as NVD and vendor security advisories
Vulnerabilities that show a "fixed version" are resolved by updating the package, so addressing these before vulnerabilities without a fixed version quickly reduces the vulnerability count.
Step 5: Viewing SCA Scan History
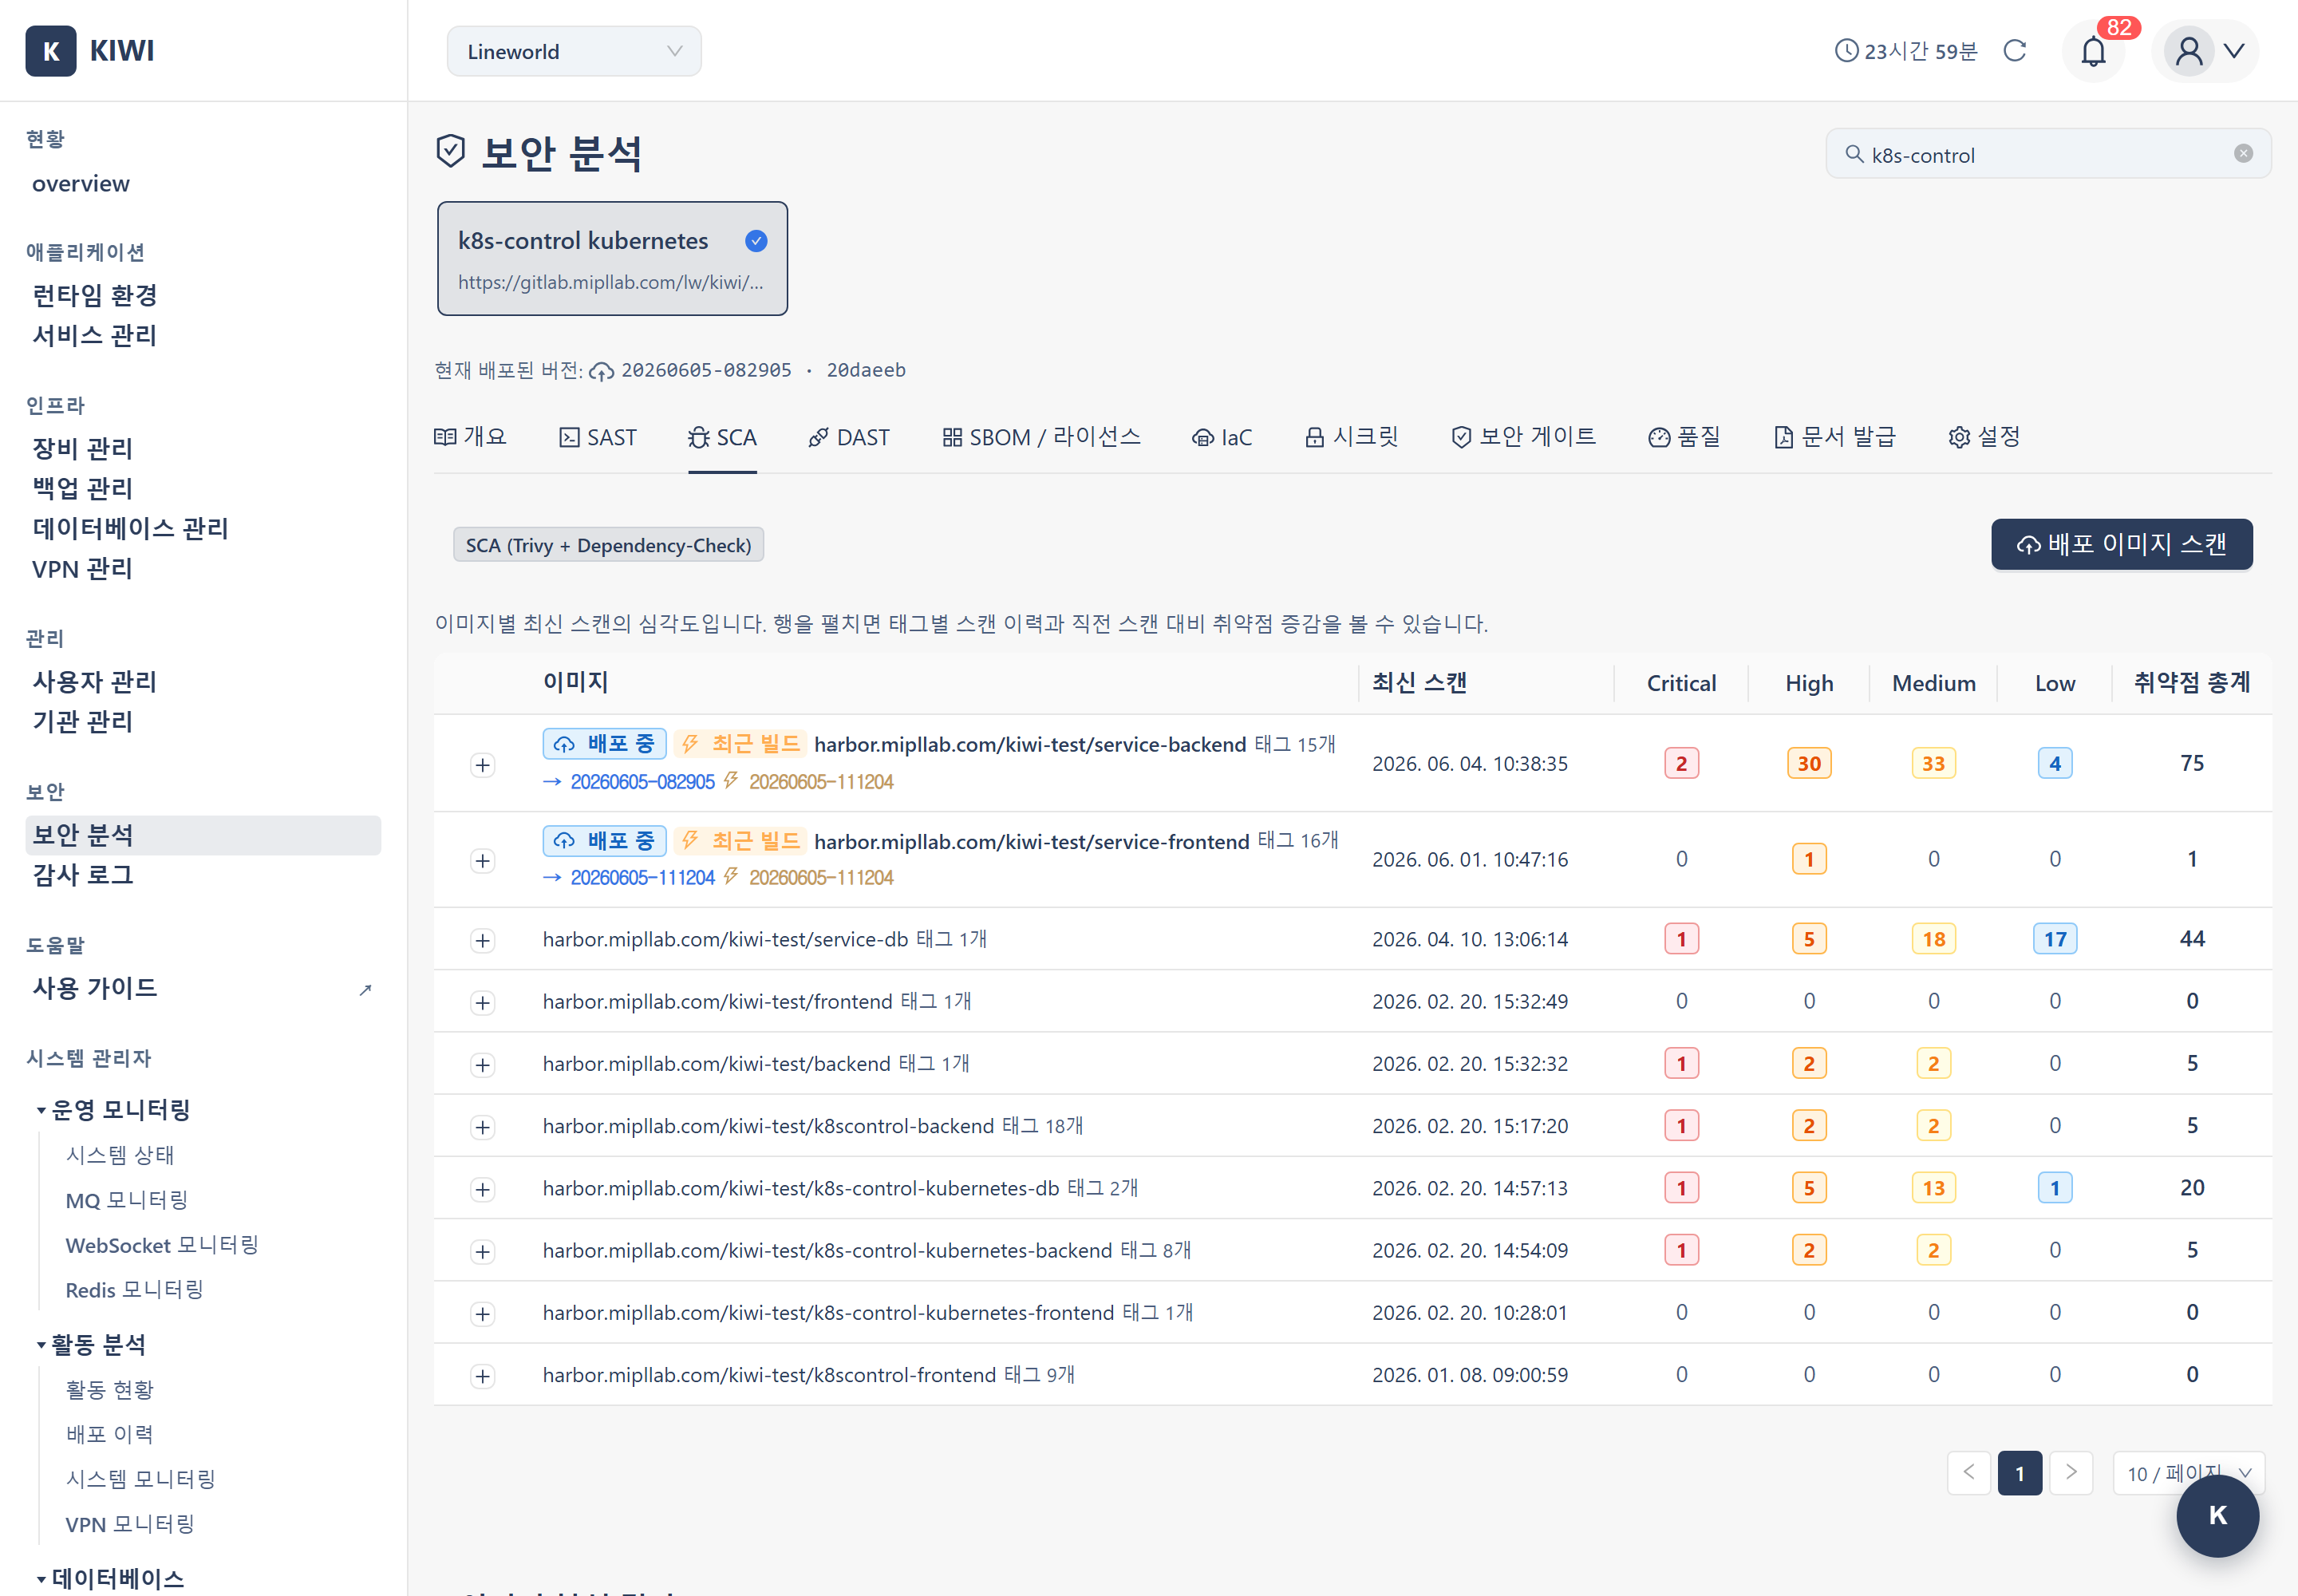
SCA accumulates and retains the result of every scan. In the "Scan History" section of the SCA tab on the [Security Analysis] page, you can see the following.
- Parent row per image repo: Rows are grouped by image repository, showing the severity counts of the latest scan.
- Expand per-tag history: Expanding a parent row lists the scan history per tag in newest-first order, along with the change in vulnerabilities compared to the previous scan.
- Scan/rescan triggers: The [Scan] / [Rescan] button on each row runs a scan for that image directly.
- Priority badges: The currently deployed image and the most recently built image are marked with badges, making it easy to tell which image to inspect first.
- "Viewing" label: The selected image row displays a blue "Viewing" label with an eye icon, visually indicating which image's results are shown in the results area.
The risk shown on the dashboard and security gate is calculated against the currently deployed image only. Vulnerabilities in previous builds or undeployed images are not reflected in the current risk, so deploying a new build can change the gate verdict.
VEX Hub Filtering (Backend Default ON)
What Is VEX?
VEX (Vulnerability Exploitability eXchange) is data that assesses whether a particular vulnerability actually affects the product. Even if a vulnerable function exists in the code, there is no impact if that function is never called.
How It Works
- KIOPS enables VEX Hub filtering by default in the backend during SCA scans.
- The UI does not provide a toggle for users to enable or disable VEX filtering.
- VEX verdict results are recorded together in the SBOM.
Filtering States
- Affected: Actually affected - action is required.
- Not Affected: Not affected - excluded by the VEX verdict.
- Fixed: Already fixed - resolved in the latest version.
- Suppressed: An item excluded from display by VEX or user handling
Fixing Vulnerabilities
Package Updates
The most common fix is to update the package to a version where the vulnerability is resolved.
- Check the "fixed version" in the scan results.
- Update the dependency file to that version.
# Node.js example
npm update lodash

# Python example
pip install --upgrade requests - Rebuild the image.
- Rescan to confirm the vulnerability is resolved.
If the base image itself has many vulnerabilities, switching to a newer version or a different image is effective. Alpine Linux includes a minimal set of packages, so it often has fewer vulnerabilities.
# Vulnerable version
FROM node:16-alpine3.14

# Fixed version
FROM node:20-alpine3.19
Troubleshooting
Scan Failure
- Image pull failure: Stored registry credentials may be expired or have insufficient permissions. Refresh the credentials in the credential settings.
- Timeout: A scan may time out if the image is too large. Consider optimizing the image.
- DB update failure: This occurs when the vulnerability database update fails. Check the network connection and try again.
Over-Detection (Too Many Vulnerabilities)
If too many vulnerabilities are detected and management becomes difficult, classify confirmed items as false_positive or accepted_risk to reduce noise. Replacing the base image with a safer one is also effective.
Related Guides
- SAST Scan - Source code analysis
- SBOM Generation - Separate scan run from the SBOM · License tab
- DAST Scan - Dynamic analysis